Installing & Using Photoshop Custom Shapes

Compatibility:
Photoshop 7 to current version
This tutorial will walk you through how to install and use Photoshop custom shapes. You can find my shapes here.
1. First off, download a custom shapes set. In this example, I will be using our Banners & Scrolls Shapes set. It will come in ZIP format, so you’ll need to unzip it using your favorite ZIP extraction software.
The extracted file should have a .CSH extension. When you’re extracting/unzipping, it will ask you where you want to place the .csh file. If you’re in Windows, choose Program Files > Adobe > Photoshop > Presets > Custom Shapes (this may vary depending on your version of Photoshop and where you installed, but the last few directories will be the same). If you’re on a Mac, find the folder where you installed Photoshop (usually your applications folder), and choose Photoshop > Presets > Custom Shapes.
2. Now open Photoshop. (If you had it open during the installation, you’ll need to close it and re-open it before the file will show up automatically in the custom shapes listing.)
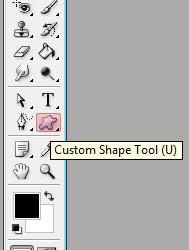
Click on Photoshop’s custom shapes tool (or click “U”). If the custom shapes tool isn’t showing, click “U” to find the right spot on the tools palette, then right click on it to bring up your options, then choose “Custom Shape Tool.”
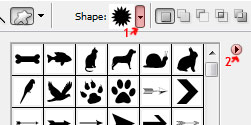
3. Now to load our shapes set. In your top bar, just below your menu, look for the shape thumbnail, and click on the small arrow just to the right of it (marked “1” in our illustration).
That window that pops up shows your currently loaded shapes. In order to load our set, we’ll want to click on that small arrow on the upper right corner of that window (marked “2” in our illustration). Find “SS-scrolls-banners” in that list, and click on it. Photoshop will ask you if you want to “Replace current shapes with the shapes from SS-scrolls-banners.csh?” Choose Ok.
4. You should now see the banners & shapes from our set in your preview window. Click on one of them. I’ll be using shape number “18.”
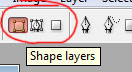
Up on the left part of the top bar, you’ll see three choices for how you want to use that shape. Assuming that you want to use it to create a shape and not a path, choose the one on the left – “Shape Layers.” This will create a custom shape in the design that you have chosen, and it will be very easily manipulated or resized if you should need to do so later – without any loss in quality!
5. Hit “D” on your keyboard to switch your foreground/background colors to black/white. Open a new file with File > New (or PC: CTRL-N / Mac: Command-N). Make it 1500 by 1500 pixels, resolution doesn’t matter, color mode of RGB, background contents white.
Click on the upper left portion of your canvas and drag down and to the right. You should see the shape. If you want to make sure that the ratio stays the same as what it was originally, then hold down SHIFT as you drag (you can even pick it up and let it go to see the difference AS you’re dragging). Once you let go, your shape is created.
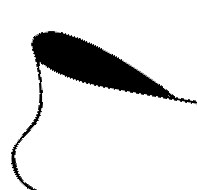
6. You’ll notice an odd line around it, like this. That line is showing you the path of the shape.
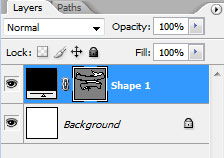
You’ll also notice something a bit odd in your layers palette. It’s actually applying that shape or path as a vector mask (something you don’t need to understand to use shapes, but thought I’d point it out to those of you that use masks). Basically, in the case of shapes, that means that we can still resize or transform that shape any time we want, without any blurring or loss of quality. It’s resizing or reshaping the path, not a bunch of pixels, so it’s much more precise.
7. That’s the basics on installing & using Photoshop’s custom shapes. Tip: If you want to get a better view of that design without the path line showing around the edges, you can do one of two things:
- Right click on that layer with the shape and choose “Rasterize Layer.” However, once you do this, the shape will be converted to pixels, and will not be able to be reshaped or resized without loss of quality.
- In your layers palette, click on the “Paths” tab. You should see the “Shape 1 Vector Mask” path highlighted. Click anywhere just beneath that path to deselect it. Now you can switch back to your “Layers” tab to continue working, and you should be viewing the shape without that line around it.