A set of Photoshop & GIMP brushes composed of various fairy wings! Some of these are different from your traditional plain ol’ fairy wing, with glowing tendrils of dots and such. High resolution, with the average brush size being about 1800 pixels. Includes both right and left wings.

Programs: Photoshop 7+, Photoshop Elements 2+, Gimp 2.2.6+
Brushes: 30
Size: 11.7MB
Download the brushes
Download the image pack
Please read my terms of use before downloading!
Random Brushes Tip:
Oftentimes, you won’t want a brushes shape to be exactly how the brush was made to be. For example, these wings brushes were made to be used from “straight on” – but most times, that won’t be how you want to use them! So, in order to help them fit your model, you should follow these tips.
- Open up the file with the image where you want to use the brushes.
- On the left side, click on the brush tool. Up on top, just under the main menu, it will show you the shape of the brush that you have selected. Click on the arrow to the right of that.
- Slide the “Master Diameter” slider to the right or left so that the brush is the size that you want it to be
- Hit F7 to make sure that your layers palette is showing. If something disappears, hit F7 again. If it appears, great.
- Down at the bottom of that, you’ll see some little buttons. The one just to the left of the trash can is the “Create a New Layer” button. Click that.
- NOW click on the canvas with the brush you selected (making sure the color is what you want!).
- Over in that Layers Palette on the right, the new “Layer 1″ layer should still be highlighted. By putting this brush on its own layer, you can now manipulate the brush and not the rest of the painting/image.
Edit > Transform > Distort - In that little box that shows up, click on the various corners of the image to distort the brush shape so that it’s how you want it.
You can use this method to change the angles of things, the basic shape, as well as the perspective!
Say that you wanted to use one of our Arcane Circles brushes, and have it look like its lying on the floor. You would follow the same steps above, and when it comes time to drag the corners to distort the image, you would move the top two corners toward each other and down a bit. The bottom two corners, you would widen. This should make the circle look like it’s sitting on a floor! Fine tune it by moving the corners as you see fit, to make it fit your specific floor angle.


40 Responses to “
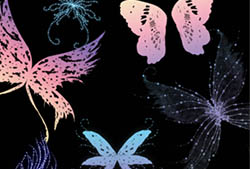
Fairy Wings Photoshop & GIMP Brushes”
This is just what I needed to do a gift for a little girl…I am making her a name frame (I don’t sell them! I just make them as gifts) and I thought she would like a “fairy/princess” type, Can’t wait to play with these!
Oh, and thanks for the tip above, that really helped.
that was simple and easy to follow, now where is the next step?
@Fairy: The next step all depends on what you’re trying to do! Once you get it how you want it, you’re done… at least, with that brush. Now on to the rest of the design!
Stephanie
I am soooo new to this. I am assuming my next step would be to add color to the brush, however I am in the process of looking it up online as to how I would need to proceed. If you have any tips that could point me in the right direction I am sure my employer would appreciate it.
I love thes brushes for my pictures of my grandchildren …again thank you…
Love these! Thank you for sharing.
Stephanie,
I’ve recently begun a major overhaul of my website/blog (sorry it’s currently down as I’m writing this due to the remodeling), and I’ve been looking to redesign my ‘fairy-toad’ logo and in looking for images of ‘fairy wings’ I came across Obsidian Dawn and found this brush set. It’s perfect! The number of wing sets is giving me a lot to play around with and is exactly what I was looking for. When my remodeled site goes up I will definitely be providing a link back to Obsidian Dawn. I can’t wait to download more of the brush sets you have and start using them on some of my photos, new ideas are already popping into my head of things that I can do (which to be honest hasn’t happened in a while).
Thank you again!
~Tink
Thanks, estan padrísimos estos diseños, desde mexico city, thank you, i’m experiencing now in photoshop, and you are so wonderful to share this.
Thanks for these brushes. They are so useful
[...] Glittery Fairy Wings Available for download @ Obsidion Dawn [...]
thanx ^^
i was looking for fairy stuff for a while now
I was just wondering with one you reccomend to download.Just the brushes or the image pack?
@Miki: If you have Photoshop or GIMP, just the brushes. The image pack is just the JPGs I used to make the brushes, and is made for people that don’t have Photoshop/GIMP, so they can use them to make brushes in their own program. Hope this helps!
i love these. jus wat i wanted.. thanks
geez thank you soooo much.
your work is just amazing
here’s what i did with them, if you wanna see.
http://www.flickr.com/photos/jumpingcarrotsbunny/3432432864/?addedcomment=1#comment72157616542391625
thank you!!!
hihi~
wow these brushes are fantastic…but i cannot seem to get the wings behind the pics? can i know the trick behind this?
when i use GIMP program, to add these brushes to it….it just stay on the top layer…how?
can anyone help me on this?
really bad at this…appreciate if someone can guide me as to how to add the fair wings to my photos??
thanks~
@Amelia: You’d need to find a whole tutorial to explain that, but here’s the gist of it. What you need to do is separate your background layer from your foreground. In other words, you’re going to need to copy and paste the person that you want the wings to go on into its own, new layer. And then, you put the wings on a layer between those two layers.
But even easier would be to just erase the wings where they should be going “behind” the person. :)
@Stephanie: wow really thanks a lot…becoz i use GIMP and apparently i did not see the layer toolbox…so i unable to differentiate the different layers.
i guess erasing the wings is a easier method currently…till i figure out about the layer ting…thks so much~ =)
@Stephanie: can i ask u something on resizing the wings? when i place it on top, i cannot seem to adjust the size to smaller? coz when i click n drag it seem to be in its original size…can teach me hw to do it?
really appreciate ur great help~ =)
[...] | 下载页面 VN:F [1.4.3_701]提交中…Rating: 0.0/10 (0 votes [...]
[...] 下载 | 下载页面 [...]
Wonderful – thank you!
Thank you, cool brush! This is all we need for fairy brush! a little bit modifications will do the trick!
Thank you very much…
hmmm how do i get it onto my gimp
[...] If meddlesome picture pack, download images website here: [link] [...]
HOLA ESPERO PODER TENER FONDOS Y PINCELES EN PHOTOSHOP
[...] Fairy Wings Photoshop Brushes – A set of fantasy wing brushes for creating fairies and other mythical creatures. [...]
thanks a lot dude, this is very useful.. u make life so easy :)
Hi, thanks for sharing these, now ive just got to figure out how to get them on the picture! Thanks again :)
Thank you.Just wonderful!
Thank you so much for these!!! You are so talented and I appreciate the graciousness of sharing that talent with all of us. Amazing!!!!
I simply LOVE these brushes!! They are exactly what I was looking for. =D
Thanks bunches Obsidian Dawn! You do some amazing work.
Best of wishes ~Sha’
[...] Fairy Wings Photoshop Brushes – A set of fantasy wing brushes for creating fairies and other mythical creatures. [...]
@Stephanie: I can’t even stand how excited I am to have these brushes! I’ve always been drawn to digi scrap kits with fairy stuff and especially wings and now I don’t have to worry about looking for what I want, I can just make it myself!!! =) I wanted to know, though, in your preview you show them with different colors but I only know how to use brushes with one color. Did you use the gradient tool to do that or is there some other trick I don’t know about? Thank you!
@Jessica: That’s the gradient tool, yep. I put each of the fairy wing sets on its own layer, and used a gradient on it.
Another possible way for various colors would be to use the brush once, do a color overlay, then duplicate that layer. On the duplicate layer, change the color to a different overlay color. Then, erase the parts of that top layer that you want in the first color (which would allow the brush layer beneath it to show through), and voila!
So glad you’re enjoying them!
Oooh! Great suggestion on the multiple layers/eraser trick! It seems so simple, I can’t believe I never thought of that! You could have so much fun with it, though, even changing your eraser to different brushes depending on the project. Hmm, fun ideas! Thanks so much!!!
unfortunately I cannot open these files after downloading them. Does anyone know what is wrong? I have vista and the photoshop software?
@Susan: Are you unzipping them? If so, is the problem with the unzipping or the installing into Photoshop? Try checking out my sidebar for “Installing Brushes” and “Unzipping the File” and you should get some help in those areas. If you’re doing everything it says and still having trouble, write back and let me know specifically where the problem lies and I can help. :)
Leave a Reply
Other Links
Member Center
Getting Started
Affiliates
Helpful Links
Follow Us
By Program
Latest Downloads
Popular Now
Web Design and All Content
© 2004-2009 Obsidian Dawn