This tutorial will walk you through how to install and use a Photoshop pattern set. You can find our patterns here.


1. First off, download the pattern set. In this example, I will be using our Lace Patterns set. It will come in ZIP format, so you’ll need to unzip it using your favorite ZIP extraction software.

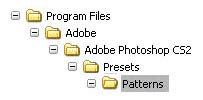
The place that you’re going to want to unzip it is important. If you put it into your Photoshop Patterns folder, the next time you open up Photoshop, that pattern will be sitting there already available for use. Very handy! So, extract the file (in this case, SS-lace-patterns.pat) into your Program Files > Adobe > Photoshop (whatever version you have) > Presets > Patterns folder.
2. Open Photoshop. Click File > New.. and make it 500 by 500 pixels. You can keep the resolution at 72 pixels or whatever it is set to initially. Make sure the color mode is RGB. Set the “Background Contents” to transparent. This means you will be starting with a completely transparent canvas, rather than a white background.

On the tools palette, choose any foreground color.

Using the paint bucket tool, click anywhere on your canvas. It should fill completely up with that color.

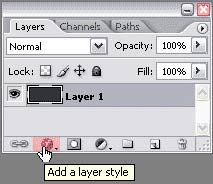
3.Now we need to make sure that your layers palette is visible. To do that, click on “Window” in the top menu, and be sure there is a checkmark next to “Layers.” If there isn’t, click on it. Your layers palette should look something like this.
Keep in mind that when you apply a pattern, you’ll be applying it to the entire layer. So, if you wanted the pattern to only apply to a certain part of your image, you would need that part of the image on its own layer.
We’re going to be applying it to that whole layer we just filled in with the paint bucket, in this case. To do so, click on the Layer Styles button on the lower left hand side of your layers palette, which I’ve highlighted in red. Select “Pattern Overlay..”

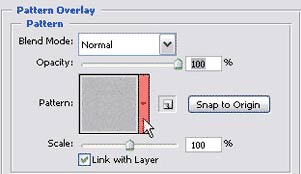
4.A menu will pop up, and if you look back at your canvas, you’ll notice that a pattern is now covering it!
See how none of that blue (or whatever color you chose) shows through? That’s because the “Blend Mode” is set to “Normal.” We’ll talk more about Blend Modes later – for now, leave it on normal. To change the pattern, click on that small rectangle to the right of the pattern image. I’ve highlighted it in red here.

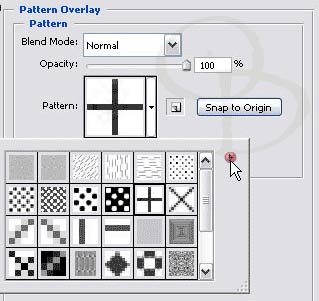
5.A smaller window with a bunch of other patterns will pop up. If this is your first time using Photoshop’s patterns, you will be seeing one of their default pattern sets. What you see in the image to the right is our Micro Patterns set.
Changing the pattern is as easy as clicking on one of those little boxes. Feel free to do so now, and watch as the pattern on your canvas changes.
Now, to load the lace patterns set.
Click on the small arrow on the right side of all the patterns.

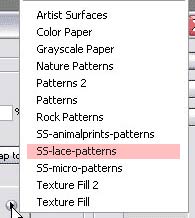
6.A menu will pop up that looks like the one here (although the top part of mine is cut off).
The bottom section is all the different pattern sets that you have installed on your computer. Photoshop comes with quite a few sets already.
In order to change to another pattern set, simply click on that set’s name. If you have put your SS-lace-patterns in the proper directory, it should be showing up in your list now. Click on it to select it, then click “Ok” if a box pops up asking you if you want to “Replace current patterns with the patterns from SS-lace-patterns.pat?”

7.You should now be viewing the thumbnails from my Lace Patterns set.
Now to play around with this a bit.
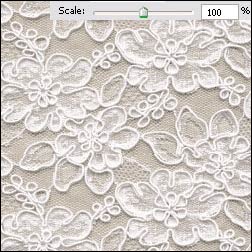
Choose a lace pattern. I’ve chosen the pretty beige one you can see to the right.
Once you click on it, you’ll be back to the “Layer Style” box and should see that pattern on your canvas.
Notice the “Scale” option?
Here’s what that pattern looks like at 100% (its original size).

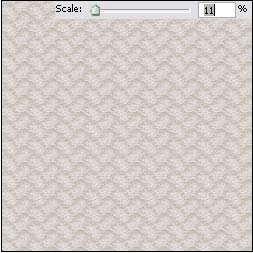
8.Slide that little arrow to the right and left and see what happens.
See how the pattern gets bigger or smaller?
That’s the beauty of patterns. They are (or should be) seamless, so they will repeat over and over across the entire surface of the layer that you apply them to, and you can make them whatever size you want.
The image on the right shows that same pattern with a scale of 11%.
While you’re still on this screen, you can shift the pattern around, too. Just click anywhere on your canvas, and drag the pointer around. This will move the pattern with it. Try it and see.

If at any point you want to return to its original position, click on the “Snap to Origin” button.

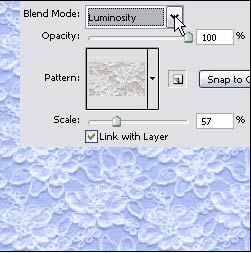
9.That’s all well and good, but what if you like the lace pattern but don’t want it to be pink/peach?
No problem! Remember how your layer was blue? (Or whatever color you made it.) Using the “Blend Mode” option, you can change the way that the current pattern interacts with the layer that you have it applied to.
I changed mine to “Luminosity” and look at what happened!
The different blend modes would be a tutorial in themselves to explain, so I’m just going to say go ahead and change it to each one to try it out and see how it changes on your canvas.

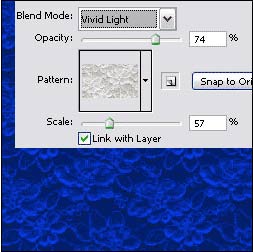
10.Here it is using Vivid Light.
Also notice that I changed the Opacity. That’s another setting that you can play around with. If you barely want the lace pattern to show up, use a lower opacity.
When you have your settings how you want them, click “Ok.”
That’s it! You can now use patterns in Photoshop.
You can apply patterns in a layer style (like we just did) to any layers you want, including text and shapes! (Check out the title of this tutorial above.)


27 Responses to “Installing Photoshop Patterns Tutorial”
This tutorial was really helpful for someone switching from PSP to PS. Thanks!
Hmm… How about textures and such? I can’t seem to get it up in PS CS3. I’ve put the textures in the folder where it should be and that should be it, right? But I can’t find the textures anywhere… Could yoy help me out?
Rice Bunny: This only works for Photoshop Pattern files, like the ones I have here on the site under “Patterns” on the top menu. It’s a .pat file that you need to be placing into your Presets > Patterns folder, and then it should show up like the tutorial describes.
Make sure you’re using the right type of file, and not just placing textures in there randomly – that won’t work.
If it IS a .pat file that you’re placing in there, restart Photoshop. If you add it while PS is open, they won’t show up until the next time you start it. That may be your problem.
Awesome patterns!!
Wow this tutorial was great! Very easy to understand and follow. I will be bookmarking this website and coming back to learn even more.
Thank You!!
Great tutorial – it was easy – I am 65 and still learning – go figure – I think I’m still in my 30′s.
I love the look of your grungy patterns. However, when I unzipped them they were .jpg files and not .pat files! Please help!
@Rhonda: Then you downloaded the image pack instead of the patterns. Make sure you’re clicking on “Download the Patterns” instead of the second link. Probably just a misclick. :)
Let me know if you still can’t get it working, but I’m sure that’s what it was!
Thank you~~~ Thank you~~~ Thank you~~~
For bringing me out from shadow:)
Great stuff, thanks!
…? wtf is this. Where am I
Thanks for the info!
Thanks so much for the tutorial; it’s finally starting to make sense :)
K…Gimp 2.6.7 user here…
I’ve downloaded the brushes successfully..Looks great..
I am however having trouble with the patterns..
I’ve downloaded and unzipped, and the folder is in the “patterns” folder..
The patterns did not show up when I started Gimp, so I went to Patterns menu and refreshed the patterns and got the following messages:
“Failed to load data”. Failed to open file. Permission denied
“Failed to load data”. Couldn’t recognize the image file format for the file.
“Failed to load data”. Fatal parse error in pattern file. Unknown pattern format version 65536.
Something simple turned into something complex…any help would be appreciated..
Erik
@Erik: I’ve heard varying stories about Photoshop patterns working with GIMP. Some people claim that they do NOT work, ie, GIMP has not added functionality for Photoshop PAT files yet. A few others have told me that they DID get them working, but I’ve heard more that they do not.
However, what you CAN do is download the “Image Pack” that I make available with my patterns, and use those to make your own patterns. They’re just the JPG files, and you’ll have to open them up and make them into GIMP patterns (not sure how to do that, sorry – not a GIMP user) for usage that way.
Best of luck!
Thank you..I will try that…
I am not really a Gimp user either, but I’m hoping it
will work…
ok..
downloaded the image pack..extracted…placed folder in the gimp patterns folder..Opened Gimp, opened Flames1.jpg…clicked “Save as”…changed the file extension to “.pat”….Went to the patterns menu and clicked “Refresh Patterns”…
And Flames1.pat is now available…
Time consuming to change each one…but it does work for all those having problems with Gimp….
Thank you Stephanie..
Wonderful Tutorial! I’m just moving from GIMP and Paint.net to Photoshop and have been totally intimidated — until now. You’ve got a clear writing style that I can follow and love that your asides give explicit directions to new users without leaving me feeling stupid. Even for folks using CS4, this was a great lesson.
every-time I do program files(mine is called %programfilesdir% is that a problem? o-e)>Adobe > Photoshop (version i have) BUT then there’s not folder called ‘Presets’ i can’t find it anyway!please help!Dx
@lovable hamster: Wow, that’s an odd one. Are you on a Windows or a Mac?
I’d suggest doing a search for “presets” and letting Windows/Mac OS find it for you. It sounds like you may not be in the right place, maybe some temp folders or something?
Well, nevermind… they are showing up now when I “normally” open Gimp. Whoopsie.
Helped A Lot! Thankies!
Thanks for these lace patterns! They seem to be just the thing thatI have been looking for. I built scale models of lowrider cars, these patterns will turn into decals for those models.
[...] Installing Photoshop Patterns Tutorial [...]
We have a photo studio in our town and Adobe Photoshop is our primary software for photo editing. .`
I had the same aforementioned problem with gimp for patterns, so I extracted the pattern’s image files to my patterns folder, opened one up and saved it as .pat. Then I refreshed my patterns box and noticed that all the images were added as patterns. Just thought I’d mention this for other gimp users to try so they don’t waste time re-saving the image files as .pat when GIMP can read the images (.jpg) as patterns. I’m not sure if this will always work or whatnot, but it’s worth a try–just extract the images files to your patterns folder and see :)
I am trying to install these patterns on Photoshop Elements 6 but I do not have a “Layer Styles” button in my Layers Pallette. Any help would be appreciated. Thanks!
Leave a Reply
Other Links
Member Center
Getting Started
Affiliates
Helpful Links
Follow Us
By Program
Latest Downloads
Popular Now
Web Design and All Content
© 2004-2010 Obsidian Dawn